Unbound is a free and open source BSD licensed caching DNS resolver. It also works with DNSSEC and in recursive mode. Coded in C programming language. It means it runs on Linux, Windows, *BSD and Unix-like operating system.
Why use encrypted unbound DNS over TLS on CentOS Linux?
DNS is an old protocol. It was not created with privacy in mind. Anyone can snoop your unencrypted DNS traffic even though connected to privacy and security enhanced HTTPS based web service.
How to see DNS queries sent around the internet in an unencrypted format
Open the terminal application on macOS or Linux based system or your router. Type the following command to capture traffic:
tcpdump -vv -x -X -s 1500 -i <interface_name> 'port 53'
 tcpdump -vv -x -X -s 1500 -i br0 'port 53'
 tcpdump -vv -x -X -s 1500 -i wifi0 'port 53'
 tcpdump -vv -x -X -s 1500 -i eth1 'port 53'
Open another terminal session and type DNS queries:
host google.com 1.1.1.1
 host dnsknowledge.com 8.8.8.8
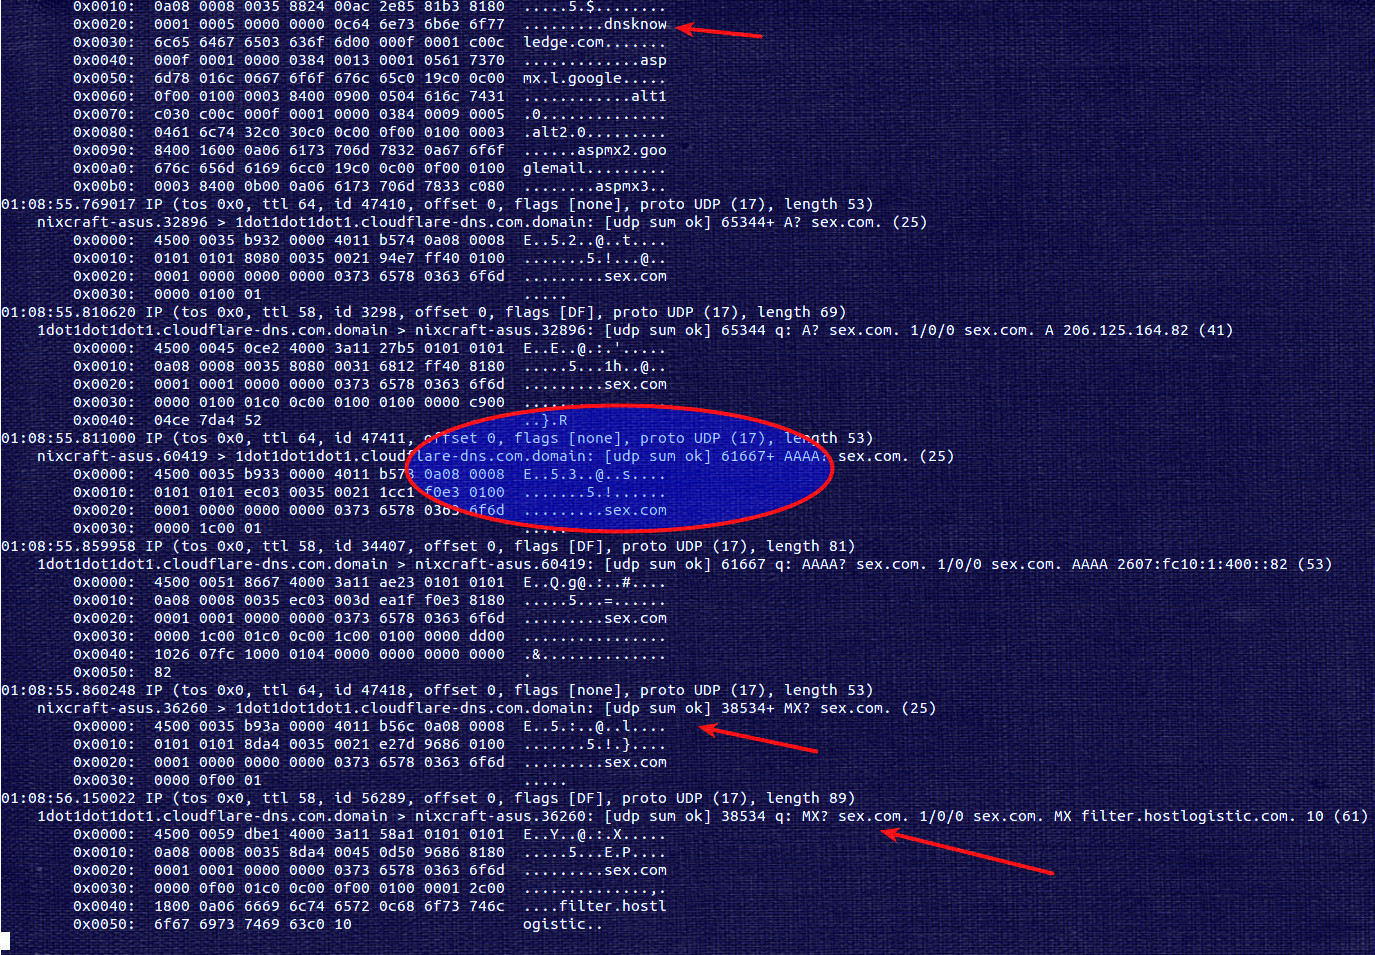
One can see all DNS queries/data with an unencrypted format (click to enlarge image)
From the above image, it is clear that unencrypted DNS leaks data to anyone who is monitoring your network or Internet connection. In most cases, your ISP will sell data to 3rd parties or they might build a profile about you.
How to install unbound in CentOS Linux 7
Type the following commands:
# yum install epel-release
 # yum update
 # yum install unbound
Resolving Dependencies
--> Running transaction check
---> Package unbound.x86_64 0:1.6.6-1.el7 will be installed
--> Finished Dependency Resolution

Dependencies Resolved

================================================================================
 Package           Arch             Version                Repository      Size
================================================================================
Installing:
 unbound           x86_64           1.6.6-1.el7            base           673 k

Transaction Summary
================================================================================
Install  1 Package

Total download size: 673 k
Installed size: 2.4 M
Is this ok [y/d/N]: y
Turn on service
# systemctl enable unbound
 Created symlink from /etc/systemd/system/multi-user.target.wants/unbound.service to /usr/lib/systemd/system/unbound.service.
Configure encrypted unbound DNS over TLS on CentOS Linux
Update /etc/unbound/unbound.conf
# vim /etc/unbound/unbound.conf
Make sure LAN is allowed to access this server:
#control which clients are allowed to make (recursive) queries
access-control: 127.0.0.1/32 allow_snoop
access-control: ::1 allow_snoop
access-control: 127.0.0.0/8 allow
access-control: 192.168.1.0/24 allow
Secure DNS over TLS in Unbound configuration on CentOS
#Adding DNS-Over-TLS support
server:
forward-zone:
name: "."
forward-ssl-upstream: yes
## Cloudflare DNS
forward-addr: 1.1.1.1@853
forward-addr: 1.0.0.1@853
## Also add IBM IPv6 Quad9 over TLS
forward-addr: 9.9.9.9@853
forward-addr: 149.112.112.112@853
## IPv6  Cloudflare DNS over TLS
forward-addr: 2606:4700:4700::1111@853
forward-addr: 2606:4700:4700::1001@853
How do I verifying the certificates of the forwarders with this setup?
The following will only work with the latest version of unbound and not with the current version of unbound server shipped with the CentOS 7.x. Update config as follows:
#Adding DNS-Over-TLS support
server:
tls-cert-bundle: /etc/pki/ca-trust/extracted/pem/tls-ca-bundle.pem
forward-zone:
name: "."
forward-ssl-upstream: yes
## Cloudflare DNS
forward-addr: 1.1.1.1@853#cloudflare-dns.com
forward-addr: 1.0.0.1@853#cloudflare-dns.com
## Also add IBM IPv6 Quad9 over TLS
forward-addr: 9.9.9.9@853#dns.quad9.net
forward-addr: 149.112.112.112@853#dns.quad9.net
## IPv6  Cloudflare DNS over TLS
forward-addr: 2606:4700:4700::1111@853#cloudflare-dns.com
forward-addr: 2606:4700:4700::1001@853#cloudflare-dns.com
Start/restart the service
# systemctl restart unbound
Test it
host google.com your-server-ip-here
 host google.com 192.168.1.254
Verify privacy and security settings with the tcpdump
tcpdump -vv -x -X -s 1500 -i <interface_name> 'port 853'
 tcpdump -vv -x -X -s 1500 -i br0 'port 853'

All dns data encrypted (click to enlarge image)
Conclusion
This quick tutorial showed how encrypting your DNS traffic can help privacy protect your internet browsing. By using Unbound DNS cache server, you are able to allow CentOS Linux 7.x to take advantage of DNS-over-TLS to help encrypt web traffic. I strongly suggest that you use the following pages for more information about using Unbound as a DNS privacy server:
- Unbound home page/help page
- Verify TLS cert at nlnetlabs when usign DNS over TLS
- IBM quad9 home page
- Cloudflare DNS home page
Thanks for your awesome tutorial.
I have some problem with Unbound on ubuntu 18.04 (latest version)
How can I get this
tls-cert-bundle: /etc/pki/ca-trust/extracted/pem/tls-ca-bundle.pem
thanks
I’ve one question, I set up unbound on ubuntu 18.04 vps, how can I get this tls-cert
#Adding DNS-Over-TLS support
server:
tls-cert-bundle: /etc/pki/ca-trust/extracted/pem/tls-ca-bundle.pem
My upstream will be 9.9.9.9
How can I get this tls-cert from 9.9.9.9
#Adding DNS-Over-TLS support
server:
tls-cert-bundle: /etc/pki/ca-trust/extracted/pem/tls-ca-bundle.pem
I’m using Unbound(latest version) on Ubuntu 18.04
After comparing this with the unbound.conf man page, I noticed that you have forward-ssl-upstream in the server options section of your configuration instead of the forward zone options. Is there a reason for this?
Thanks very nice tutorial.